Monday, October 24, 2011
It All Comes Out
Last night, I finally told my parents that Colton and I are engaged. They have never really liked our relationship, but we love each other and that's what matters. They aren't very happy with the idea of it, but I think after some time they will warm up to the idea and be more supportive. My parents have had a sort of "vision" of what my future should be like and this definitely doesn't fit into their plans. Because they are so far away from me and I am currently without a car or other mode of transportation, I had to call them and tell them over the phone. The conversation went really well until we got to the part about my engagement. It hurts because they said they don't know if they can support my decision and they didn't say much else about it. I really want them to be involved, but it's hard when we have differing views on what's best for me. There is still time before the time actually comes for the wedding for them to warm up to it. I just hope it's enough time.
Thursday, October 20, 2011
Shoes, Shoes, Shoes!
This one wasn't that big of a problem for me. I just ordered my dress, veil and petticoat online and they should all be here in a month or two. I can't wait!! Ahhh!! I would post pictures of those, but I don't want my husband-to-be snooping around and finding them. Shoes were next on my to-do list. That was a bit of a problem at first because I didn't know if I wanted high heels or flats or strappy shoes or any sort of idea where to look. I ended up deciding on flats just because they would be much comfier and functional than heels. The internet has lots of fabulous shoes, but all of them seemed a bit high priced for a plain white shoe. Then I turned to the next best thing: my closet. As it turns out, I already have a pair of white shoes that I never even wore! They have just been sitting in the back corner of my closet for about 4 years never even touched. It just so happens that they are PERFECT for wearing all day at the ceremony and reception! So that's one more thing I can check off my list and they were free! (Partially... I did pay for them at some point of course.) Here is a picture of what they look like:

I wish everyone else luck on their shoe search!
I wish everyone else luck on their shoe search!
Wednesday, October 19, 2011
Improvising Nature
So all of the florists I have looked at are ridiculously expensive. I tried thinking of how I could save money on flowers, but no matter what it looked like it would always be eating a hole out of my bank account. That was until I made the amazing discovery of Kusudama Origami Flowers.

I found these little treasures on www.foldingtrees.com and instantly fell in love with them. I'm going to use them for all the bouquets and boutonnieres. They save so much money and they look so cute! I'm going to take the liberty of copying the tutorial from Folding Trees just so you won't have to jump back and forth. All accreditation goes to them! None of this is mine. I just want to make that very clear to any copyright sharks out there. Anywho, this is how to make a Kusudama Flower Ball:
Part One
The Japanese Kusudama is a paper ball made out of identical origami shapes glued together. They were traditionally used as a ball for incense or potpourri but now we see them more for decoration or as a gift.
There are many different patterns to make a Kusudama ball but I find this the easiest pattern to get started.
What you need for this tutorial is:

Fold the bottom corner to the top. This will make a triangle.

Fold the right and left corners up to the middle corner. This makes a square.

Fold the same points down. The folded edge will line up exactly on top of the outside edge of the square.

Open up the flaps you have just created and flatten them.

Fold the top triangles towards you so they are level with the edges of the paper. (This will result in 3 little petals on the inside of your petal; if you fold the top triangles away from you, this will result in only 1 petal on the inside of the petal.)
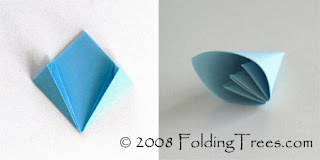
Fold the triangles back using the crease you made earlier and glue the outside triangles together.
Now make 5 more of these petals and glue them all together. Make sure you wait until the glue is dry after every petal and take your time. You will need 12 flowers to complete the Kusudama ball; I will show you how to complete it in part 2.

Part Two
In part 1, I showed you how to make the individual flowers; you should now have 12 flowers made from 60 individual petals.
For part 2 you will need:

As you might be able to see from the finished Kusudama at the top of the page, I made 6 flowers from blue paper and 6 flowers from a recycled map. To make it easier to see how I am putting the ball together I will use 1 blue flower in the middle and 5 map flowers around it.

Start to glue the flowers together one petal at a time - this will give the nicest result. In the photo (right) you can see that you apply the glue a little to the right of the middle line. Hold the 2 pieces together in place with your fingers until the glue is dry. Then glue the second petal in the same way.

When you add the 3rd flower, there are 3 petals to connect. Make sure you work from the middle; glue, hold in place, wait until the glue is dry. Now work your way all around the first flower.

After you have attached all 6 flowers you will end up with 2 sets of half a Kusudama. Now it is time to attach the cord.

I used 3 beads on the bottom. (Left pic) I made a knot over the first bead to lock it in place and the put the other beads on the string, locking it in again with an overhand knot.

Now take your 1/2 Kusudamas and put some glue on the top. You can see the yellow glue I used on the right-hand picture.

Glue your string down, making sure it is nice and straight. Now glue the other half of the string down, making sure this time that you put the glue exactly on the middle of the petal. After this is nice and dry, start gluing the other half of the Kusudama on top of the first half. I normally work around from the top.
That's it! You have finished your Kusudama ball, now find a nice spot in your home for it.
Okay, me again. Can you see why I love these? I'm going to make a whole bunch of these with my own little flair of course. Don't worry, I'll post lots of pictures and give you all my DIY do's and dont's. I hope this inspired somebody else out there because I love them!

Photo via www.foldingtrees.com
Part One
The Japanese Kusudama is a paper ball made out of identical origami shapes glued together. They were traditionally used as a ball for incense or potpourri but now we see them more for decoration or as a gift.
There are many different patterns to make a Kusudama ball but I find this the easiest pattern to get started.
What you need for this tutorial is:
- 60 pieces of paper cut into squares. The pieces are each 7x7cm or 3x3in.
- Glue.

Fold the bottom corner to the top. This will make a triangle.

Fold the right and left corners up to the middle corner. This makes a square.

Fold the same points down. The folded edge will line up exactly on top of the outside edge of the square.

Open up the flaps you have just created and flatten them.

Fold the top triangles towards you so they are level with the edges of the paper. (This will result in 3 little petals on the inside of your petal; if you fold the top triangles away from you, this will result in only 1 petal on the inside of the petal.)

Fold the triangles back using the crease you made earlier and glue the outside triangles together.
Now make 5 more of these petals and glue them all together. Make sure you wait until the glue is dry after every petal and take your time. You will need 12 flowers to complete the Kusudama ball; I will show you how to complete it in part 2.

Part Two
In part 1, I showed you how to make the individual flowers; you should now have 12 flowers made from 60 individual petals.
For part 2 you will need:
- 12 flowers (made from 60 petals)
- Glue
- String or a ribbon
- Bead(s)

As you might be able to see from the finished Kusudama at the top of the page, I made 6 flowers from blue paper and 6 flowers from a recycled map. To make it easier to see how I am putting the ball together I will use 1 blue flower in the middle and 5 map flowers around it.

Start to glue the flowers together one petal at a time - this will give the nicest result. In the photo (right) you can see that you apply the glue a little to the right of the middle line. Hold the 2 pieces together in place with your fingers until the glue is dry. Then glue the second petal in the same way.

When you add the 3rd flower, there are 3 petals to connect. Make sure you work from the middle; glue, hold in place, wait until the glue is dry. Now work your way all around the first flower.

After you have attached all 6 flowers you will end up with 2 sets of half a Kusudama. Now it is time to attach the cord.

I used 3 beads on the bottom. (Left pic) I made a knot over the first bead to lock it in place and the put the other beads on the string, locking it in again with an overhand knot.

Now take your 1/2 Kusudamas and put some glue on the top. You can see the yellow glue I used on the right-hand picture.

Glue your string down, making sure it is nice and straight. Now glue the other half of the string down, making sure this time that you put the glue exactly on the middle of the petal. After this is nice and dry, start gluing the other half of the Kusudama on top of the first half. I normally work around from the top.
That's it! You have finished your Kusudama ball, now find a nice spot in your home for it.
Okay, me again. Can you see why I love these? I'm going to make a whole bunch of these with my own little flair of course. Don't worry, I'll post lots of pictures and give you all my DIY do's and dont's. I hope this inspired somebody else out there because I love them!
Friday, October 14, 2011
Some Things to Think About
I never realized how much there was involved in planning a wedding... without a wedding planner. That's right, I am attempting to do this 100% on my own so my entire wedding will be completely personal without any outside input. That may sound a bit crazy, but I know I'm not the only one who has been dreaming about her wedding day since she was four years old. For those other self-challenge type of bride-to-be's out there, I thought I might help you out a little bit. I have been scouring the web for months getting all sorts of ideas and checklists and research and it can be a little overwhelming. Here is a nice pocket-sized list of questions you may want to ask yourself. Let the checklists come later once you find some time to get an organization binder filled up. (I'm still working on getting all the components of mine. Pictures and templates will be posted once it is completed.)

- What season do you want your wedding in? Be sure to consider weather trends and décor when finding an answer to this question. Think of contrasting holidays or big family events that may happen at the same time that you don't want to conflict with.
- What are your colors going to be? Most brides stick with one or two, but you can have an entire palette of colors to make your wedding vibrant and fun.
- Do you want to have a themed wedding? If so, what would your theme be? Sometimes themed weddings can mean more decorations and planning, but some brides might think of it as a guide to how their final wedding will look like.
- How many people do you want to be there? A wedding can be private or large, depending on how intimate you want it to be. Most people want their entire family and friends there which tends to make the numbers hike up a bit higher than you may have first anticipated.
- Do you want an indoor or outdoor wedding? This can be an important factor when searching for a ceremony venue.
- Do you want your ceremony and reception at the same place or separate? Most venues do not have the option of having both a ceremony and reception, but if you look hard enough you can find a pretty good deal.
- How many bridesmaids/groomsmen do you want? Who will they be? On average, the number of bridesmaids ranges anywhere from 2-12. It all depends on your comfort level.
- What will your cake look like? Will it be the classic white or do you want something bold and drastic?
- Check out http://weddingcakecreations.com/ for some interesting wedding cake ideas.
- What do you want your dress to look like? I know it seems like a simple question, but once you start looking you may find that there are several dress styles you really like. Try and narrow it down to 2 or three. It is a good idea to have a dress picked out around 7-9 months before your wedding date, or even sooner than that if you feel comfortable. You want a "safety period" to have any alterations made that you may need.
- What kind of food do you want to serve? Some ideas are just desserts like cookies and candy, a full course dinner, hors d'oeuvres, kebabs, cocktail hour, or any other kinds of foods that you may want.
Of course, there are many, many things that go into planning a wedding. These are just a few things to get you started on your planning process. Another important thing to consider is the venues you will need. Not all of them are necessary, but here is a list of what most brides look for:
- Ceremony Venue
- Reception Venue
- Music, Band
- Hairstylist
- Makeup Artist
- Catering
- Florist
- Photographer
- Videographer
- Cake Baker
- Officiant
- Dress Maker
As I said before, not all of these are necessary, but they are definitely something to consider. Don't get too excited just yet and go jumping into your planning process. I did that and it came to bite me in the end. I can't emphasize enough how important it is to remember how much you are willing or able to spend on making your special day come to fruition. My fiance and I aren't very wealthy, so we know that we have to budget every penny to make this happen. Think about a final number you want (say $5,000 as your total amount) and try to fit everything into that price range. Keep track of how much things cost and what they are going to be used for. Don't jump at the first opportunity that presents itself. Do your research first. Even if you fall in love with a certain venue, it may be out of your price range or unreasonable in some other way. I had to change my mind several times and I'm still not sure if I found the perfect place yet.
I hope this helps somebody out there. It would have been nice if someone had told me these things when I first started planning. Here I am 8 months away from my own wedding and hardly anything has been done. Ahh!!

Image via smartbrideboutique.com
Thursday, October 13, 2011
In the Beginning...
This is my very first post, so I guess I will give you a mini breakdown of who I am. Although I am only 18, I know what I want to do with my life as well as who I want to do it with and how I'm going to get there. My dream is to become a veterinarian and open my own clinic someday. There is no one I would rather spend my life with than my fantastic fiance Colton. We have known each other since seventh grade and have grown closer as the years went on. We dated for about 3 1/2 years when he finally popped the question on July 31, 2011 at the Renaissance Festival. Of course you can tell I said yes or else there would be no reason for this blog to exist, would there? Well, we originally planned for a 2 year engagement but plans changed and it looks like now we are aiming for July 23, 2012 to be the day we officially become man and wife. I can't wait!
Even though everyone says there is plenty of time left before the actual wedding to get things done, I am going to do my very best to get as much done as I can before the special day comes. I am going to spend the rest of my life with my best friend and I want every last miniscule detail to be absolutely 100% perfect so I don't have to worry about a thing.
Even though everyone says there is plenty of time left before the actual wedding to get things done, I am going to do my very best to get as much done as I can before the special day comes. I am going to spend the rest of my life with my best friend and I want every last miniscule detail to be absolutely 100% perfect so I don't have to worry about a thing.
Subscribe to:
Posts (Atom)