So all of the florists I have looked at are ridiculously expensive. I tried thinking of how I could save money on flowers, but no matter what it looked like it would always be eating a hole out of my bank account. That was until I made the amazing discovery of
Kusudama Origami Flowers.
I found these little treasures on
www.foldingtrees.com and instantly fell in love with them. I'm going to use them for all the bouquets and boutonnieres. They save so much money and they look so cute! I'm going to take the liberty of copying the tutorial from Folding Trees just so you won't have to jump back and forth. All accreditation goes to them! None of this is mine. I just want to make that very clear to any copyright sharks out there. Anywho, this is how to make a Kusudama Flower Ball:
Part One
The Japanese Kusudama is a paper ball made out of identical origami shapes glued together. They were traditionally used as a ball for incense or potpourri but now we see them more for decoration or as a gift.
There are many different patterns to make a Kusudama ball but I find this the easiest pattern to get started.
What you need for this tutorial is:
- 60 pieces of paper cut into squares. The pieces are each 7x7cm or 3x3in.
- Glue.
Below I will show you how to make the basic shape. You need to make 60 of these. Every flower will then have 5 of these shapes or petals glued together making a total of 12 flowers. I will explain how to glue them together in part 2.
Fold the bottom corner to the top. This will make a triangle.
Fold the right and left corners up to the middle corner. This makes a square.
Fold the same points down. The folded edge will line up exactly on top of the outside edge of the square.
Open up the flaps you have just created and flatten them.
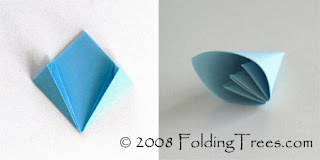
Fold the top triangles towards you so they are level with the edges of the paper. (This will result in 3 little petals on the inside of your petal; if you fold the top triangles away from you, this will result in only 1 petal on the inside of the petal.)
Fold the triangles back using the crease you made earlier and glue the outside triangles together.
Now make 5 more of these petals and glue them all together. Make sure you wait until the glue is dry after every petal and take your time. You will need 12 flowers to complete the Kusudama ball; I will show you how to complete it in part 2.
Part Two
In part 1, I showed you how to make the individual flowers; you should now have 12 flowers made from 60 individual petals.
For part 2 you will need:
- 12 flowers (made from 60 petals)
- Glue
- String or a ribbon
- Bead(s)
As you might be able to see from the finished Kusudama at the top of the page, I made 6 flowers from blue paper and 6 flowers from a recycled map. To make it easier to see how I am putting the ball together I will use 1 blue flower in the middle and 5 map flowers around it.
Start to glue the flowers together one petal at a time - this will give the nicest result. In the photo (right) you can see that you apply the glue a little to the right of the middle line. Hold the 2 pieces together in place with your fingers until the glue is dry. Then glue the second petal in the same way.
When you add the 3rd flower, there are 3 petals to connect. Make sure you work from the middle; glue, hold in place, wait until the glue is dry. Now work your way all around the first flower.
After you have attached all 6 flowers you will end up with 2 sets of half a Kusudama. Now it is time to attach the cord.
I used 3 beads on the bottom. (Left pic) I made a knot over the first bead to lock it in place and the put the other beads on the string, locking it in again with an overhand knot.
Now take your 1/2 Kusudamas and put some glue on the top. You can see the yellow glue I used on the right-hand picture.
Glue your string down, making sure it is nice and straight. Now glue the other half of the string down, making sure this time that you put the glue exactly on the middle of the petal. After this is nice and dry, start gluing the other half of the Kusudama on top of the first half. I normally work around from the top.
That's it! You have finished your Kusudama ball, now find a nice spot in your home for it.
Okay, me again. Can you see why I love these? I'm going to make a whole bunch of these with my own little flair of course. Don't worry, I'll post lots of pictures and give you all my DIY do's and dont's. I hope this inspired somebody else out there because I love them!


